A Development Environment for React.js – Setting up and Optimizing it

React and its associated libraries are growing at an astonishing pace. It’s not only being used to build complex user interfaces but also being implemented in online stores, e-commerce websites and other businesses to build fast and scalable apps. 

If you are just getting started with React.js, the first challenge is to get your development environment set up and ready for coding. This can be a little tricky as there are so many different tools, libraries, and frameworks that you need to work with together. In this article we will walk you through the process of setting up an optimal React development environment on macOS or Windows.

In this post, we will look at what React is, why it became so popular recently, how to set up a development environment for React and optimize it for your project.

1. Get the tools you need

To get started, you will need to install a few different tools. 

  • A text editor for writing code, like VS Code or Sublime Text.
  • A browser for testing and debugging your application, like Chrome or Safari.
  • A code compiler that can translate your code from JavaScript into another language. 
  • A build tool that can generate the final code for your application. 
  • A package manager for installing the different tools you need for your application.

This depends on a number of things – your project type, the OS you are working with, the software versions of the tools you are using, etc.

2. Install Node.js and create an npm script

Next, you will need to install Node.js. Visit the official link and download to install. The next step is to set up a React Boilerplate. Setting up the React environment depends on the Node version. 

For old versions of Node and Boilerplate (before 8.10 and 5.6 respectively)

Install Boilerplate globally. To do so, run the following command in the terminal or cmd prompt.

npm install -g create-react-app

If successful, the terminal should show the following output.

For versions of Node and Boilerplate (8.10 and 5.6 and after respectively), the machine uses the latest features of Javascript. Run the command given below.

npx create-react-app my-app

The output should be as given below, thus creating the app name my-app. This can be changed according to your preference. However, this will also be used and be displayed in all future steps.

Running the project requires the following commands as shown in the output above.

cd my-app

npm start

The output will be as shown in the terminal snapshot below.

The App should now be viewable in the browser, as shown.

3. Set up a React development environment with Create-React-App

  • Create-React-app is a tool that can set up a new React development environment for you, including all the necessary Node modules, development server, and build configuration. 
  • Once you have installed create-react-app and run the create-react-app command, it will ask you a couple of questions, after which it will create a new React development environment. 
  • The create-react-app command is also a npm script.

The command is: 

create-react-app myapp

The above command should create a directory my-app in your current directory with all the necessary files required to run a React App. A snapshot of the directory so created is as given below.

The significant files here are index.html and index.js. The index.html file has a div element (id=”root”), which houses all the steps rendered and the React code will be stored in the index.js file.

4. Starting the Development Server:

To do that, go into the current directory (myapp in this case) and execute the following command line.

npm start

The following message should come up on your compiler.

You can go to the URL shown above to see the changes you are making in your App getting reflected. By default, the above URL will show the below page:

5. Optimizing your Development Environment

Debugging 

When you’re working in a development environment, you can easily debug your application using Chrome. 

  • You can debug your application using the built-in debugger in Chrome, which allows you to set breakpoints, view variable values, and step through your code.
  • To use the debugger, you need to enable the developer tools in Chrome. 
  • You can also use the debugger with a remote debugger, which allows you to run the debugger on a separate computer, like your laptop.

Optimizing Your Environment for React Development

While your development environment is ready, you can also optimize it for React development by taking a few extra steps. 

  • The first thing you need to do is install the React development tools. The React development tools provide several features, including automatic refreshing of your application while you are making changes and live reloading your application when you make a change. 
  • Another thing you need to do is install the ESLint code linter for React – The ESLint code linter can find common mistakes and errors in your code, like missing semicolons or using incorrect syntax. 
  • The ESLint code linter also provides suggestions for improving your code, like using a better naming convention or applying a best practice.

Conclusion

React gives you the ability to create reusable UI components that can be used across different parts of your application. With React, you can build your application using these reusable components, which are faster to create, easier to maintain, and easier to understand. Setting up your development environment is the first step towards creating applications with React. When you are done setting up your environment, you can continue with learning how to build your application with React.



Automating Mobile App testing

With more than 10.97 billion mobile connections worldwide, there is an increasing need for sophisticated, high-performance B2B and B2C mobile apps. The worldwide mobile app industry has been expanding at a rate of over 11.5% per year, with a market value of over $154.06 billion. The COVID-19 shift to remote work and the increase in online time usage have further driven this growth.

Expectations are high in this mobile-first environment, and there is zero tolerance for bugs or performance difficulties in mobile apps, whether they be SaaS products, loyalty apps, or e-Commerce apps.

The best ways to test mobile apps, including the best test cases to automate and how to choose the best framework for mobile automation testing, will be discussed in this article.

Why should you be Automating Mobile App Testing?

Testing mobile apps more quickly and comprehensively across platforms and test scenarios requires automation. Even though automating mobile app testing is notoriously difficult, most test cases can be done in this way.

Setup Mobile Automation Testing Goals

Let’s study manual mobile app testing vs Automated Mobile App Testing.

Manual Mobile App Testing Automated Mobile App Testing
Human performs the tests step by step, without test scripts Executed automatically via test automation frameworks, along with other tools and software
Testing is time-consuming Testing is time-saving
Entirely manual tasks Most tasks can be automated, including real user simulations
Difficult to ensure sufficient test coverage Easy to ensure greater test coverage

Automation aims to improve the effectiveness, in terms of both time and expense, and quality of your mobile app testing. Always keep in mind these two primary objectives while determining which test case types are eligible for automation:

  • Can I save time by automating this test case?
  • Will automating this test case improve my app’s functionality or quality?

Planning Test Cases

Unit tests, functional tests, and integration tests are the types of mobile app test cases that are automated frequently.

Here are the 3 types of test cases to automate:

  1. Unit Testing

The fastest testing method is unit testing. These tests are usually inexpensive to correct, highly reusable, and simpler to troubleshoot.

  1. Integration Testing

Integration testing ensures that all modules and interfaces function as intended. When these tests are automated, the testing process is sped up and feedback is received more rapidly.

  1. Functional Testing

Functional testing is another testing category that should be given priority for automation. You can evaluate how well your app works across different devices, operating systems, and other differences by automating functional UI testing. 

Selecting a Test Automation Framework

Once you’ve decided which test cases you want to automate, the following step is to choose the ideal automation framework or integrated system which establishes the automation guidelines for your test. Consider the test automation framework to be the best method for writing and evaluating your tests. Below are the top six frameworks for automated mobile app testing.

Mobile Automation Frameworks

  1. Linear Automation Framework
  2. Modular-Based Testing Framework
  3. Library Architecture Testing Framework
  4. Data-Driven Framework
  5. Keyword-Driven Framework
  6. Hybrid Testing Framework

Mobile Application Testing Checklist

The factors you can consider when selecting a mobile app testing tool are:

  • OS support (iOS/ Android/ Windows)
  • Type of tests supported (unit tests, regression tests, functional tests, etc.)
  • Easy-to-use, which includes script-less test creation, simple tutorials, clear reporting
  • Integration with existing CI/CD tools
  • Cost and scalability

Selecting the Right Automation Testing Tool

We can write test scripts using one or more of the above test automation frameworks with the use of mobile automation testing tools. A basic awareness of the frameworks will assist to ensure you acquire the proper tool for the job at hand, even though it is not required to fully comprehend them to select the best mobile testing tool.

Top Mobile Testing Tools to Choose

  1. Appium

A versatile, open-source tool called Appium is highly suited for black box testing of native iOS, Android, or Windows apps, as well as hybrid and mobile web apps since it uses numerous languages and frameworks. Although Appium makes it simple to reuse test cases across platforms, testing may be slower or less accurate when using Appium.

  1. Google Espresso

Espresso is designed particularly for Android, Java, and white box testing and UI tests. It is made by Google.

3.XCTest & XCUITest

Swift/Objective C, Apple’s XCTest, and XCUITest leverage libraries for iOS testing, and it is suited for white box testing.

4. Robotium

Robotium is an open-source application which is designed specifically for Android. It supports grey and black box testing. Since this testing offers advantages but has stalled in recent years.

Executing Your Mobile App Tests

You’ll need to make a few choices once you’ve chosen a framework and are prepared to run your tests.

The first has to do with the kinds of testing platforms you’ll use. Will you run your tests on actual hardware or simulated hardware like emulators and simulators? Or you will combine the two?

Virtual Devices vs Real Devices

Both the hardware and the operating system will be subjected to extensive mobile app testing. However, testing mobile devices is impossible due to the wide range of mobile device types and setups. Let’s take Apple for example – while it may be great to test on actual mobile devices, testing on several  generations of smartphones, with several models in each generation may practically prove to be very difficult. 

Best practices advise testing on at least one of each target device to be realistic, with the remaining testing being done on virtual devices (known as simulators or emulators). With a little reduction in accuracy, virtual devices may emulate many features of actual devices more quickly and cost-effectively.

Testing Infrastructure

Your next consideration for test execution is whether to execute tests in the cloud or on the premises. It is recommended to test in a cloud-based environment for several reasons. It offers the team more flexibility and other benefits.

  • Accessible from anywhere for globally dispersed teams
  • 24/7 availability
  • Clouds are easier to scale
  • Help you extend test coverage
  • Faster way to access new releases
  • More secure than on-prem solutions

Conclusion

You may start creating your test cases even before you start working on your mobile app. With this strategy in mind, you can start testing your mobile app early and frequently to shorten the time it takes to market and boost performance overall. You may integrate comments and work on developing your app faster if your mobile app testing is more focused and structured.


No code automation testing – ACCELQ vs Avo Assure

In the digital age, businesses must be able to react to market changes and an increasing customer demand quicker than before. This is why automation of processes is becoming essential for any business that wants to stay ahead of competitors. However, the challenge lies in finding the right mixture of manual and automated testing without compromising on quality standards. ‘No Code Automation Testing’ helps organizations address these challenges by integrating automated testing into their software development lifecycle (SDLC). 

In this blog post, we will look at different No Code automation testing tools such as ACCELQ vs Avo Assure and their uses in different software testing phases.

No Code automation testing is a type of testing that doesn’t require any programming skills from testers or developers to create test environments or create automated scripts. It is also known as ready-to-use testing or out of the box testing. In a nutshell, no code automation can be defined as a process of automating software testing by scripting the interactions between the software and the user interface without writing any code. No Code automation testing can be used in both manual and automated testing projects as an integrated part of the overall software testing process. The key advantage of this process is that it removes the technical and programming knowledge requirements from the testing process, making it an accessible option for a wide variety of businesses.

ACCELQ – No Code Automation Tool

An easy to use No Code automation tool, ACCELQ lets you create automated UI tests through its drag and drop functionality. The tool allows you to create test cases for web applications or mobile applications by creating test scripts in its web application. It works on three different platforms, i.e. Windows, Mac, and Linux. It also integrates with functional, load, and other types of testing tools. Some of the notable features of ACCELQ include – single source of truth, real-time collaboration, test case management, etc.

ACCELQ has a lot more in terms of granular control for testing as compared to other no code solutions, such as: 

Creating a Scenario in ACCELQ

  1. Basic Details such as Name, Description, Tags are given

2. Map requirements – Establish Traceability (Use Story ID or Requirement ID Tab)

3. Custom Information – Add relevant information or custom fields for Management or analysis purposes

Creating a Test Suite in ACCELQ

A test suite is a collection of Scenarios – all bunched together to execute, analyze and track a particular action or or a number of actions. They can be Static, Filter based or Requirements based.

  1. Create a test suite by 
    1. Clicking on ‘+’ on the toolbar and selecting test suite
    2. Choosing from Static, Filter or Requirement based types
    3. Adding custom field information 

Setting up a Test Suite in ACCELQ

             1. Selecting a Scenario from depending on the type of suite – 

                    a. Static (manual selection)

      1. Search from search field and select from one of the available scenarios 

ii. Click add button

iii. Review and reorder

     b. Filter based (custom field based filters)  

    1. Add Filter link
    2. Select field name, operator, value
    3. Click the check mark and confirm the filter

       c. Requirements based (Requirement ID based)

    1. Select the JIRA or TFS project (integration supported) where the requirements are present
    2. Use the Requirements ID or Story ID to search for your specific test suite
    3. Select one or more and add to the list of requirements

            2. Setting up test case filters

    1. Search in the Test Case filter model, click on Add Filter link
    2. Select field name, operator (contains or not-contains) and the value 
    3. Click on the check-mark to confirm the filter. Adding multiple filters or modifying test setup based on your requirements is allowed

     3. Editing the test suite definition

    1. Navigate to Test cases tab
    2. Hover and click on the scenario definition line or test case filter line
    3. The Edit button also allows you to choose to edit the test suite 

Avo Assure – No code Automation Tool

Avo Assure is a no code automation testing tool that is used to create automated UI tests. It allows the user to record their actions while interacting with the application, and generates automated scripts based on those recordings. The tool can be used to test web applications or mobile applications by creating test cases in its web application. Avo Assure works on three different platforms, i.e. Windows, Mac, and Linux. It also integrates with functional, load and other types of testing tools. Some of the notable features of Avo Assure are – RSpec support, access to command line interface (CLI), parallel test execution, etc.

Some of the features of AVO Assure are 

  • Creating and executing test cases without writing code
  • Automatically generating test cases with Avo Discover
  • A visual test environment that shows you progress, current status, and makes management of testing plans and scenarios simpler with a no-code approach

Technically, Avo Assure has browser based administration and screen capture, one button accessibility testing for WCAG standards, Section 508 and ARIA, and you can play around with multiple scenarios in a single VM (independent or parallel depending on test engineer’s choice).

Authoring and Debugging a Test Case with AVO Assure

  1. MyTask Pane->Design Task

2. Add Test Step (+) with Object Name, Keyword, Input and Output.

3. Click on created step

4. Edit->Start Authoring

5. Click on Object Name drop down-> Select Object to populate keywords

6. Add Input and Output values

7. Add Test Step-> Click on Save

8. Debug test case by choosing browser icon

Once Debugging is completed, you get a message stating ‘Debug completed successfully’.

A Basic Comparison

ACCELQ AVO Assure
Design & Orchestration
  • Universe driven visual test design keeps business focus while generating Application blueprint
  • Embedded frameworks bring modularity for faster development & lower maintenance
  • Develop test scenarios based on predictive analytics and path analysis
  • Model UI and Data flows to maximize coverage with auto test generation
  • Visual test design
  • Native client & image based object identification
  • Pre-built keywords simplify test case creation
  • Shared object & test repository
  • Test data input automation
  • Debug and reporting support
Client Platform & Connectivity Support
  • Web Based
  • Desktop – Mac, Windows, Linux, ChromeOS
  • API
  • Oracle
  • Salesforce
  • SAP
  • Web-based
  • Desktop – Mac, Windows
  • Mobile – Android, iOS
  • SAP – ECC & S4/HANA
  • Oracle – EBS mainframe

via emulation

  • API – web services
  • Databases
Integration Support
  • CI-CD Integration
  • Atlassian Jira
  • Browserstack
  • Microsoft Azure TFS/VSTS 
  • Rally Cloud
  • HeadSpin
  • Selenium
  • Jenkins
  • Salesforce
  • Sauce Labs
  • CI – CD Integration
  • Jira
  • Microfocus – QC/ALM
  • Qtest
  • TFS
  • Atlassian Bamboo
  • Amazon Mobile Farm
  • Sauce Labs
  • Salesforce
  • Linux


Just like any other activity, there are certain scenarios when automation testing is a good fit, and there are others when it’s not. To determine when your organization should start automating, it is important to assess the following factors:

  • The complexity of the testing process – Automated testing is often used for testing complex and high-volume applications that are difficult to test manually. The process of creating test scripts and writing code for automation can be complex, especially for organizations that are new to automation. Thus, the first factor to consider is the complexity of your testing process. If your testing process is complex, then you should consider automating it.
  • The frequency of change in the application – Another important factor to consider is the frequency at which the application being tested is changing. If the application being tested is being changed every few weeks or months, then you should consider automating it.

No code automation testing is a great way to speed up the testing process and reduce costs associated with manual testing. Before choosing a tool for your organization, do ensure that it meets all your requirements.

Happy testing! 


LAMP Stack for web development and its evolution into LEMP

 What is a LAMP stack?

Some of today’s most popular open-source web applications – for example, WordPress and Drupal – run on the LAMP stack. That wouldn’t be surprising, since some have heard about the LAMP stack.

LAMP has a lot to offer in addition to being one of the first open-source web stacks. It is one of the most common ways to deliver web applications, and it remains so. Because it is so widely used, you are likely to come across it frequently as you update or host existing applications. Many people consider it to be the preferred platform for developing new custom web applications.

Components of LAMP for Web development

A LAMP stack is an open-source collection of software used to build websites and web applications. It consists of Linux operating systems, Apache web servers, MySQL databases, and PHP programming languages. Each component plays an essential role in the stack:

  • Linux: It is an operating system used to run the rest of the components.
  • Apache: The HTTP Server is a web server software used to serve static web pages.
  • MySQL: It is a relational database management system used for creating and managing web databases, but also for data warehousing, application logging, e-commerce, etc.
  • PHP: This is the programming language used to create web applications.

LAMP architecture

The LAMP stack has traditional three-layer architecture, with Linux serving as the foundation. Apache and MySQL are at the next level, and PHP is at the highest level. Although PHP is conceptually in the uppermost layer, the PHP component is embedded in Apache.

What is LEMP Stack?

LEMP is a bundle of server applications with Linux OS, eNgine-X(Nginx) Web server, MySQL / MariaDB Database, PHP/Perl Language.

Since Nginx handles enormous traffic, LEMP is the preferred choice for hosting companies. MariaDB is used for databases and PHP for loading dynamic web pages.

Because all the components are open-source, you may get started with the LEMP stack for FREE.

Choosing LEMP over LAMP is primarily a decision between Nginx and Apache as web servers. Both solutions are widely used and excellent, so picking among them is mostly a matter of personal preference. In terms of usability, LAMP and LEMP are equally efficient, but we can compare them based on our needs.

Basic architecture

The fundamental difference lies between Apache and Nginx design architecture. They differ in the way they handle connections and traffic and respond to different traffic conditions.

The basic architecture of Apache can lead to heavy resource consumption. It can cause issues with the server for example – slow speed.

Nginx employs an event-driven architecture. Nginx can be used on low-power systems and systems that operate under heavy loads.

Performance & Speed

Nginx is great at delivering static content rapidly and efficiently. However, if you want to host numerous websites on a single server, Apache is the better choice.

For Static content

  1. Apache serves static content using the file-based method.
  2. Nginx serves much faster when it comes to static content. 

For Dynamic Content

  1. Apache process dynamic content within the server.
  2. Nginx doesn’t process dynamic content.

Request Interpretation

The Apache and Nginx get processed and interpret requests differently. The different methods of interpreting requests to make them unique and better than others.

1. Apache passes file system location

As a physical resource on the file system location that may need more abstract evaluation. It provides the ability to interpret requirements.

2. Nginx passes URI to interpret requests

Nginx was created to be a web server and a reverse proxy. Nginx works primarily with your eyes and it translates to the system when necessary.

User-friendly – Apache is more convenient and less technical when it comes to setup & configuration. Apache is like Windows while Nginx is more like Linux. It means that Nginx is better for technical guys and Apache is good for home users.

Market & Community Share – Although Apache was introduced earlier than Nginx, it has a greater market share and community of developers. But the incredible performance of Nginx has attracted most developers.

Features of Nginx and Apache

  • Nginx uses low memory consumption technology.
  • CPU and memory usage does not get affected because Nginx is single-threaded.
  • Apache works better for dynamic websites while Nginx is best for static websites.

Evolution of LAMP to LEMP

Over a period, people found that LAMP was not very scalable, especially when it came to data storage. In such a scenario, people started to look for a scalable solution that could maintain the same functionality as LAMP as well as provide scalability. Enter, the concept of an Extended LAMP Stack. With the help of the LEMP stack, you’ll be able to handle more requests, store more data and deliver a better overall experience to the user. An Extended LAMP Stack is more than just adding more components to the existing stack as it’s a complete transformation from the existing stack. While people were using the term ‘LAMP’, they were using ‘Linux, Apache, MySQL, Php’. But, as the popularity and usage of LAMP grew, people started to use the term LAMP to refer to the above-mentioned components.

Conclusion

Both Apache and Nginx are strong, adaptable and competent. The evaluation of your unique requirements and testing with the patterns you anticipate seeing are key factors in determining which service is appropriate for you.

These differences in projects affect the capabilities, implementation time, and raw performance required to utilize solutions in production in very serious ways. Use the approach that best satisfies your goals.


How to create a Continuous Integration Pipeline with Azure DevOps

The Azure CI pipeline simplifies continuous integration in the application development process. It aims at continuous integration to persistently build and test the code and finally ship a high-performing, high-quality product. You can quickly deploy that application to various Azure services.

Prerequisites for the lab

  1. You will need a valid and active Azure account for the Azure labs. You can sign up for the FREE Visual Studio Dev Essentials if you are not a Visual Studio Subscriber.
  2. Access to a GitHub that contains .NET, , PHP, Node.js, Python, or static web code.

Sign in to the Azure portal

1. Signing into the Azure portal.

2. Type DevOps Starter in the search box, and then select Add to create a new one.

3. Select the option Bring your own code and click Next.

Azz a sample application and Azure service

  1. Choose the .NET sample application. The .NET samples have a choice of the open-source ASP.NET framework or the cross-platform .NET Core framework.

  1. Click the .NET Core application framework and select Next.
  2. As a deployment target select Windows Web App, now select Next. The application framework dictates the type of Azure service deployment target’s available here.

Setup access to your GitHub repo and select a framework

1. Select either GitHub or an external Git code repository.

  1. Click a Repository and a Branch, and then select Next.
  2. If you’re using Docker containers, change Is App Dockerized to YES.

  1. Select an application runtime and an application framework from the drop-down menu, and then select Next.
  2. After selecting an Azure service to deploy the application, select Next.

Configure Azure DevOps and an Azure subscription

1. Give a name for Project

  1. Create a new free organization in Azure DevOps Organization or select an existing organization from the drop-down menu.
  2. Select your subscription in Azure Subscription.
  3. Either enter a name in the Web app or use the default.
  4. Select a Location, and then select Done, the DevOps Starter deployment overview is displayed in the Azure portal.

6. Click on Go To Resource to view the DevOps Starter dashboard. For quick access, pin the Project in the upper right corner. The code remains in your GitHub repo or another external repo, and a sample app is set up in a repo in Azure DevOps Organization. Azure DevOps Starter deploys the app and runs the build to Azure.

  1. Select Browse to view your running app at the right, under Azure resources. The dashboard shows the code repo, CI pipeline, and your app.

You’re now set to collaborate on your app with a team.

1. Select Repositories from your DevOps Starter dashboard. Make a change to your application, and then click on Commit changes.

2. After a few moments, a build starts in Azure Pipelines. You can monitor your build status in the DevOps Starter dashboard. By selecting the build pipelines tab from the DevOps Starter dashboard, you can monitor it in the Azure DevOps organization.

Analyze the Azure Pipelines CI pipeline

  1. Select Build pipelines from the DevOps Starter dashboard.
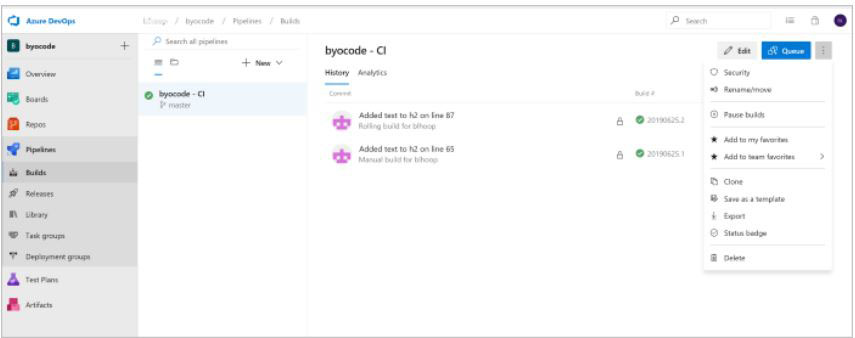
  2. You’ll see a history of the most recent builds and the status of each build once your azure pipeline page opens.

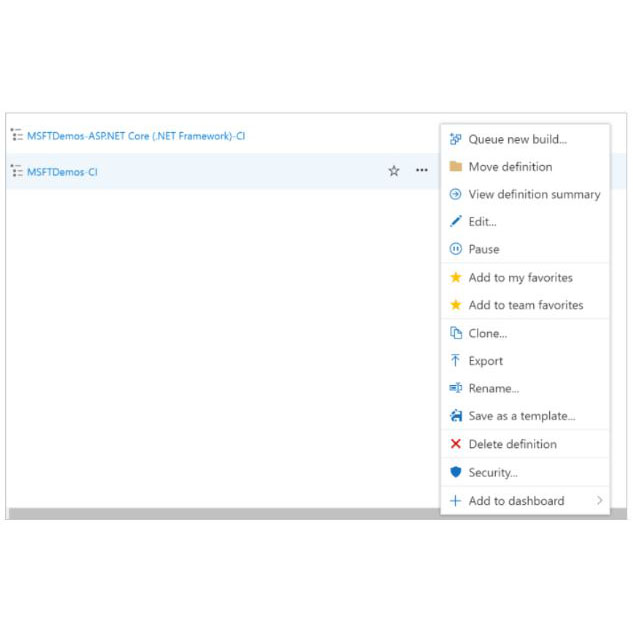
3. In the upper-right corner of the Builds page, select Edit to change the current build, Queue to add a new build, or the vertical ellipsis button () to open a menu with more options. Select Edit.

4. Click Save & Queue, and then select Save. The build does tasks like fetching sources from the repo, restoring dependencies, and publishing outputs for deployments.

  1. To see an audit trail of your recent changes for the build, select the History tab.
  2. Select the Triggers tab. With default settings, Azure DevOps Projects automatically creates a CI trigger.

When you configured your CI process in this process, you automatically created a build and release pipeline in Azure DevOps Projects. You can amend these build and release pipelines to meet the requirements of your team.

Conclusion

This is the way you can actually use and configure the continuous integration with Azure DevOps and Azure CI Pipeline. This is a great tool to work with and you will love to build Azure Projects or connect GIT to Azure DevOps.


REST & APIs: why you should be interested

We will explain Representational State Transfer (REST) principles to learn and what benefits you can get from learning.

Before 2000, Application Program Interface (or API as commonly known), was designed to be secure which was also very complex to develop and harder to maintain. A group of researchers, led by Roy Fielding, came up with the idea of REST (Representational State Transfer) which brought out the true power and potential of APIs in 2000. The purpose was to create communication between two servers that are located worldwide. They came up with principles, constraints and properties that constituted a resource-oriented architecture, client-server-based architecture, and interface uniformity which required no state preservation.

These were easily implemented using Hypertext Transfer Protocol (HTTP). It became a game-changer for the API landscape. The APIs developed under REST use less bandwidth. It is simple to develop and since the communication is supported via the internet, it is not required for the servers to be connected physically.

What is REST?

Rest stands for Representational State Transfer which is an architectural style that has gained popularity in recent years because of its simplicity and scalability. SOAP (Simple Object Access Protocol) was the de-facto way of accessing resources and communicating over the web before REST gained popularity.

RESTful APIs have also given various trends like cloud computing and microservices-based architecture. They have made communication and computing easy. Many companies prefer developers with REST knowledge as they help them develop products that are scalable, easy to maintain and make their products reach out to the world because of the power of the internet.

REST Resource

Every content in the REST architecture is considered as a resource. The resource is parallel to the object in the object-oriented programming world. They can be represented as text files, HTML pages, images or any other dynamic data. Every resource is identified globally using a URI.

What is URI?

URI is a short form of Uniform Resource Identifier used for identifying every resource of the REST architecture. Format of URI is:

<protocol>://<service-name>/<ResourceType>/<ResourceID>

There are two types of URI:

URN: Uniform Resource Name identifies the resource using a name that is unique and constant.

These follow the urn scheme and are usually prefixed with urn:

Examples:

 urn:isbn:1234567890 is used for the identification of books based on the ISBN.

 urn:mpeg:mpeg7:schema:2001 is the default namespace rule for metadata of MPEG-7 video.

It can easily be translated into a URL by using “resolver”once a URN identifies a document after which the document can be downloaded.


URL:
Uniform Resource Locator contains the information about fetching of a resource from its location.

Examples:

 http://abc.com/samplePage.html
ftp://sampleServer.com/sampleFile.zip
file:///home/interviewbit/sampleFile.txt

URLs start with a protocol like FTP, HTTP, etc and they have the information of the network hostname (sampleServer.com) and the path to the document(/samplepage.html).

Why should you care about REST?

In this section, we will discuss why REST principles are important and why it’s worth learning more about them.

  1. Easy to understand and implement

       2. Makes your application more scalable

There are multiple reasons behind REST which help make an application more scalable:

  • Stateless on the server side
  •  Faster data interchange format
  •  Caching is easier
  • Easy to modify
  • A layered system that organizes each type of server
  • Code on demand

Conclusion

In this article, we have tried to express why we value REST and why we believe you should value it as well. We hope that after reading this, the reasons to get interested in REST standards are now more clear to you and can serve as a motivation to learn more about the topic.

What is an SQA plan?

Software quality assurance (SQA) is a method of ensuring that all software engineering processes, methods, activities and work items are monitored and conform to established standards. Standards may include ISO 9000, CMMI model, ISO15504, or a combination of these standards along with others.  

SQA strives to encompass all software development processes and activities, from defining requirements, coding, debugging, and all other activities until release. As the name suggests, it focuses on preserving and delivering quality for a software product.

Software Quality Assurance (SQA) plan 

A Software Quality Assurance Plan revolves around making sure that the product or service teaches the market trouble and bug-free. It should also meet the requirements defined in the SRS (software requirement specification). 

 The purpose of an SAQ plan is three-fold. It comprises the following:

  • Establishing the QA responsibilities of the team in question 
  • Listing areas of concern that need to be reviewed, audited and looked at
  • Identifies the SQA work products

 An SQA plan will work alongside the standard development, prototyping, design, production, and release cycle for a software product or service. For easy documentation and referencing, an SQA plan will have different sections like purpose, references, configuration and management, problem reporting and corrective actions, tools, code controls, testing methodology, and more.

SQA activities

These are, quite simply put, a set of activities common to normal SQA operations. 

  1.   Creating the plan
    It consists of the engineering activities to be carried out, and ensuring the right skill mix in the team. It also lays out the specifics of the actions to be taken in different situations as well as the tools and procedures specific to the plan.
  2. Checkpoint lists
    Evaluation of quality of activities at each project stage. This means that there are regularly scheduled inspections and adherence to the schedule.
  3. Executing formal technical reviews
    FTRs are used to evaluate the design and quality of the product prototype. Quality requirements and design quality for the prototype are discussed in meetings with the technical staff.
  4. Multi-testing strategy
    Adopting multiple testing approaches to cover all bases and ensure the best possible quality.
  5. Process adherence
    Designers, developers, and other technical staff must conform to established processes and employ defined procedures. It comprises the following:

    Product Evaluation – the product is evaluated against the specifications laid out in the project management plan.Process Monitoring – verifies that the steps taken in software development are  correct and match the steps against the documentation.
  6. Control changes
    Manual and automated control tools are used for validating change requests, evaluating the nature of change, controlling and if required, arresting the change effect. In effect, this makes sure that the software being developed does not stray too far from the outlines.
  7. Measuring Change Impact
    If defects are found, the concerned department issues a fix. The QA team then determines the change and the extent of the change brought by the fix. The change should be stable and should be compatible with the whole project. There are software quality metrics that allow managers and developers to observe these activities and monitor changes throughout the SDLC of the product or service.
  8. SQA Audits
    The audit inspects the entire SDLC process to the established procedure laid out in the SQA plan. Non-compliance and missed faults can be unearthed and fixed due to this.
  9. Record and report keeping
    Keeping SQA documentation and information with associated stakeholders. This includes audit reports, test results, reviews, change request documentation, and other documentation generated during the entire SDLC.
  10. Relationship management
    Managing and interfacing between the QA and the development team, thus keeping roles in check and responsibilities ahead of the individual.

Automated software engineering techniques

There are a number of open source testing tools as well as commercially used  tools available for this purpose. Here are the most used examples.

  1. Selenium
    A portable software testing tool and automation tool for web applications. A test domain-specific language is also provided. To write test cases one can use programming languages including C#, Java, Perl, PHP, Python, Ruby, Scala, and Groovy. Selenium is a product suite of software consist of the following components:

  1. HP UFT

  HPE Unified Functional Testing was previously known as HP QuickTest Professional. It offers testing automation for functional and regression testing for software applications. It is a user-friendly IDE that provides the best sort of API and GUI testing.

SQA implementation phase

Before building an application, developers and the SQA team create a development plan. To ensure that the SDLC plan gets executed, the developers write the SDLC plan while the SQA team writes the Software Quality Assurance plan. The application that is about to be developed is already halfway done if the documents by the developers and the SQA is well written and organised.

In this phase, the SQA team’s responsibility is to ensure the implementation of the proposed features of the intended application. Along with the implementation, the method of developing the application will also be tracked by the application. There are some design methods that can be used such as language or framework. The SQA team helps the development team in selecting the proper framework or language.

The most important task of the SQA team at this stage is to implement clarity of the coding. Developers could easily write the code of the application but there is a tendency to overdo the coding. The SQA team emphasises the organisation of the coding which should be understood easily. Aside from the coding, the comments within the language are also checked thoroughly. The comments should clearly define each function.

The SQA team checks the software’s documentation. The documentation clearly states the function of the application.

SQA standards

In a typical SQA, compliance is demanded against the following standards. This may be a single standard, more than one standard, or a mix of these standards.    

  • ISO9000 
  • CMMI level (Capability maturity model Integration) 
  • TMMi (Test Maturity Model Integration) 
  • ISO15504

To remain compliant with the above-listed standards, there are a few techniques that are listed in the SQA plan. These SQA techniques include auditing, reviews, code inspections, design inspections, simulations, functional testing, walkthroughs, static analysis, standardizations, stress testing, path testing, Six Sigma principles, and more. 

 These techniques when used in conjunction with the defined SQA plan save development costs, time, and maintenance costs, boost reputations, increase product safety and give more benefits.  

 SQA is an interconnected, inter-reliant, and overarching umbrella activity that remains of paramount importance through the SDLC. To say the least, it is a prerequisite for market success and keeping up investor and consumer confidence. It ensures high quality and makes sure that the software product or service remains aligned with the business needs and functions as required when deployed.