Microsoft Azure is the second most significant cloud provider behind Amazon’s AWS. Azure has over 20% of the cloud market share and is gradually catching up with AWS. Azure DevOps is a significant factor that contributed to Microsoft’s success in the cloud space.
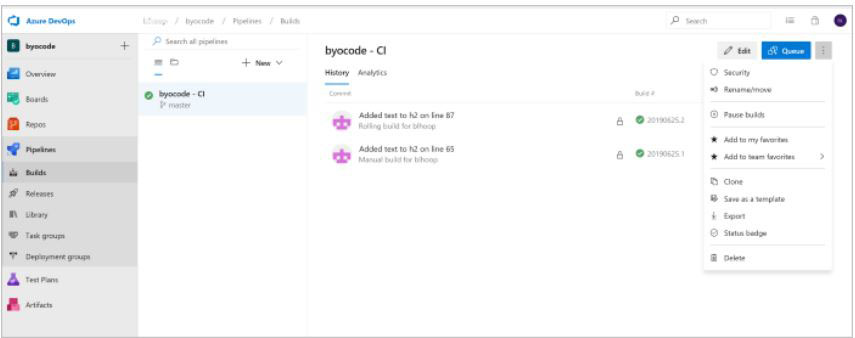
Microsoft Azure DevOps offers the capability to deploy the hosted version of the cloud or effortlessly deploy your own data center. Its offerings include a one-stop suite of services to create continuous integration and continuous delivery (CI/CD) pipelines, version control, test case management, and requirements planning and management.
This article details how DevOps engineers can effortlessly cover much of the application lifecycle with the Azure out-of-the-box components.
1. Getting started
When we pointed out that Azure DevOps technology tools easily integrate, we did not imply that simple out-of-the-box deployment is enough to get the best out of them.
When implementing a new setup on Microsoft Azure DevOps, you need to plan how you will put the elements together. Building a sophisticated pipeline can be much more challenging unless you understand CI/CD principles well. For instance, you must never stack together too many tasks in one stage when deploying an application with Azure DevOps. It leads to troubles when debugging, as all other tasks must be disabled to test a single job. This entire process is not only time-consuming but also frustrating, which defeats the purpose of DevOps.
2. Create proficiency with training
Azure DevOps is designed to be an off-the-shelf solution. However, when working with sophisticated workflow pipelines, engineers must assemble them in a way that offers a bespoke solution per the organization’s needs.
An easy way to introduce proficiency in your team to handle Azure DevOps better is to provide them with a few weeks of training. In-house software developers and architects might not be fully aware of the capabilities of the DevOps technology that can be deployed with Azure.
Also, your engineers must be preoccupied with projects which leave them little time or space to explore the full capabilities of Azure DevOps. An in-depth Azure DevOps training with people who have spent time in the trenches and have years of real-world experience can bring your development teams up to speed in no time.
3. Practice “un-deploy”
It would help if you could efficiently get the most out of Microsoft Azure. For this, you have to plan the application deployment in a phased-out manner to highlight the components that do not need to be moved to the cloud. One difference between in-premises hosting vs. cloud migration is that you are charged for everything you use. To cut costs and maximize the use of available Azure resources, you must un-deploy the processes that are not necessary. Also, DevOps engineers should create functional pipelines so that any component can be undeployed if required.
4. Put only the core team into Azure DevOps
Nothing is worse than building a failed deployment, often due to team mismanagement. With Azure DevOps, you can better manage teams reducing such failures. When too many members are working on Azure DevOps, somebody might tweak something without informing the DevOps team.
However, Azure DevOps has several security features that solve this problem. You can easily manage access to Azure DevOps, permitting only the core DevOps team to deploy. Other engineers and developers on the unit can be part of other Azure DevOps security groups and access their deployments.
5. Maximum strategy and protocol
When you have a strategy in mind, you can always handle any aspect of the project without getting lost down the line. Multiple layers of planning must include different strategies for artifact naming, scaling, monitoring/logging, security, change management, and backups/reliability. It would help if you planned the maximum strategy by involving as many stakeholders as possible such as engineers, DevOps, and QA testers.
This also creates a deployment cadence for team members to have a better overview of the entire Azure project, enabling them to deploy anything, anytime, and in any environment. You must establish a protocol for the DevOps team to follow. Let your team practice the processes you set up on Azure DevOps such that they do not face difficulties later on. As the team starts building the protocol, they will encounter challenges that they have to address and resolve.
Conclusion
Deploying to the cloud gives businesses an advantage to grow at scale. However, you have to constantly change and improve with the cloud as it makes your services better. If you are using Microsoft Azure, this guide will help you to use Azure DevOps at its full potential. Ensure you are flexible and ready to learn new tools and DevOps technology.
Talent500 is the remote team-building platform trusted by Fortune 500 companies and fast-growing startups. Sign up here to join the DevOps engineer pool and discover global job opportunities.