4 main reasons why React re-renders

React developers often build applications without ever giving the re-rendering process much thought. Most developers have enough understanding of React rendering to get by. To help you better understand re-rendering, our React experts created this article.  

What is a re-render in React?

React is known for its impressive performance, and it is made possible by the rendering of the objects on the screen. It happens in two major stages:

  • Initial render: This happens when a component or object first appears on the screen.
  • Re-render: Second or any consecutive render of the element already on screen.

Re-rendering occurs when React updates the app with some new data, often resulting from user interaction with the app. This is why non-interactive apps with no asynchronous data to handle never need re-render and the associated optimizations.

What is a necessary and unnecessary re-render?

Not every React re-rendering is necessary, and even not advised.

Necessary re-render is when you need to re-render a component that is the source of the changes in an app. Re-rendering is also helpful for parts that directly use any new information. For instance, a part that manages the user input’s state needs to update or re-render at every keystroke.

Unnecessary re-renders are propagated through an app due to several re-render mechanisms. It can be due to React coding mistakes or inefficient app architecture. For example, if instead of a part, the entire application page re-renders on every keystroke when a user types in an input field, the page re-rendering is unnecessary.

Fortunately, unnecessary re-renders are not an issue. React is very fast, and there is no noticeable difference in performance if some components re-render unnecessarily. However, too often, unnecessary re-rendering of weighty components can lead to poor user experience.

When does the React component re-render itself?

There are four main reasons why a React component would re-render itself:

  • State changes
  • Parent (or child) re-renders
  • Context changes
  • Hook changes

For some developers, this might not be the complete list, as React developers tend to believe that re-rendering happens when a component’s props change. That’s not entirely true, as you will know in a short while.

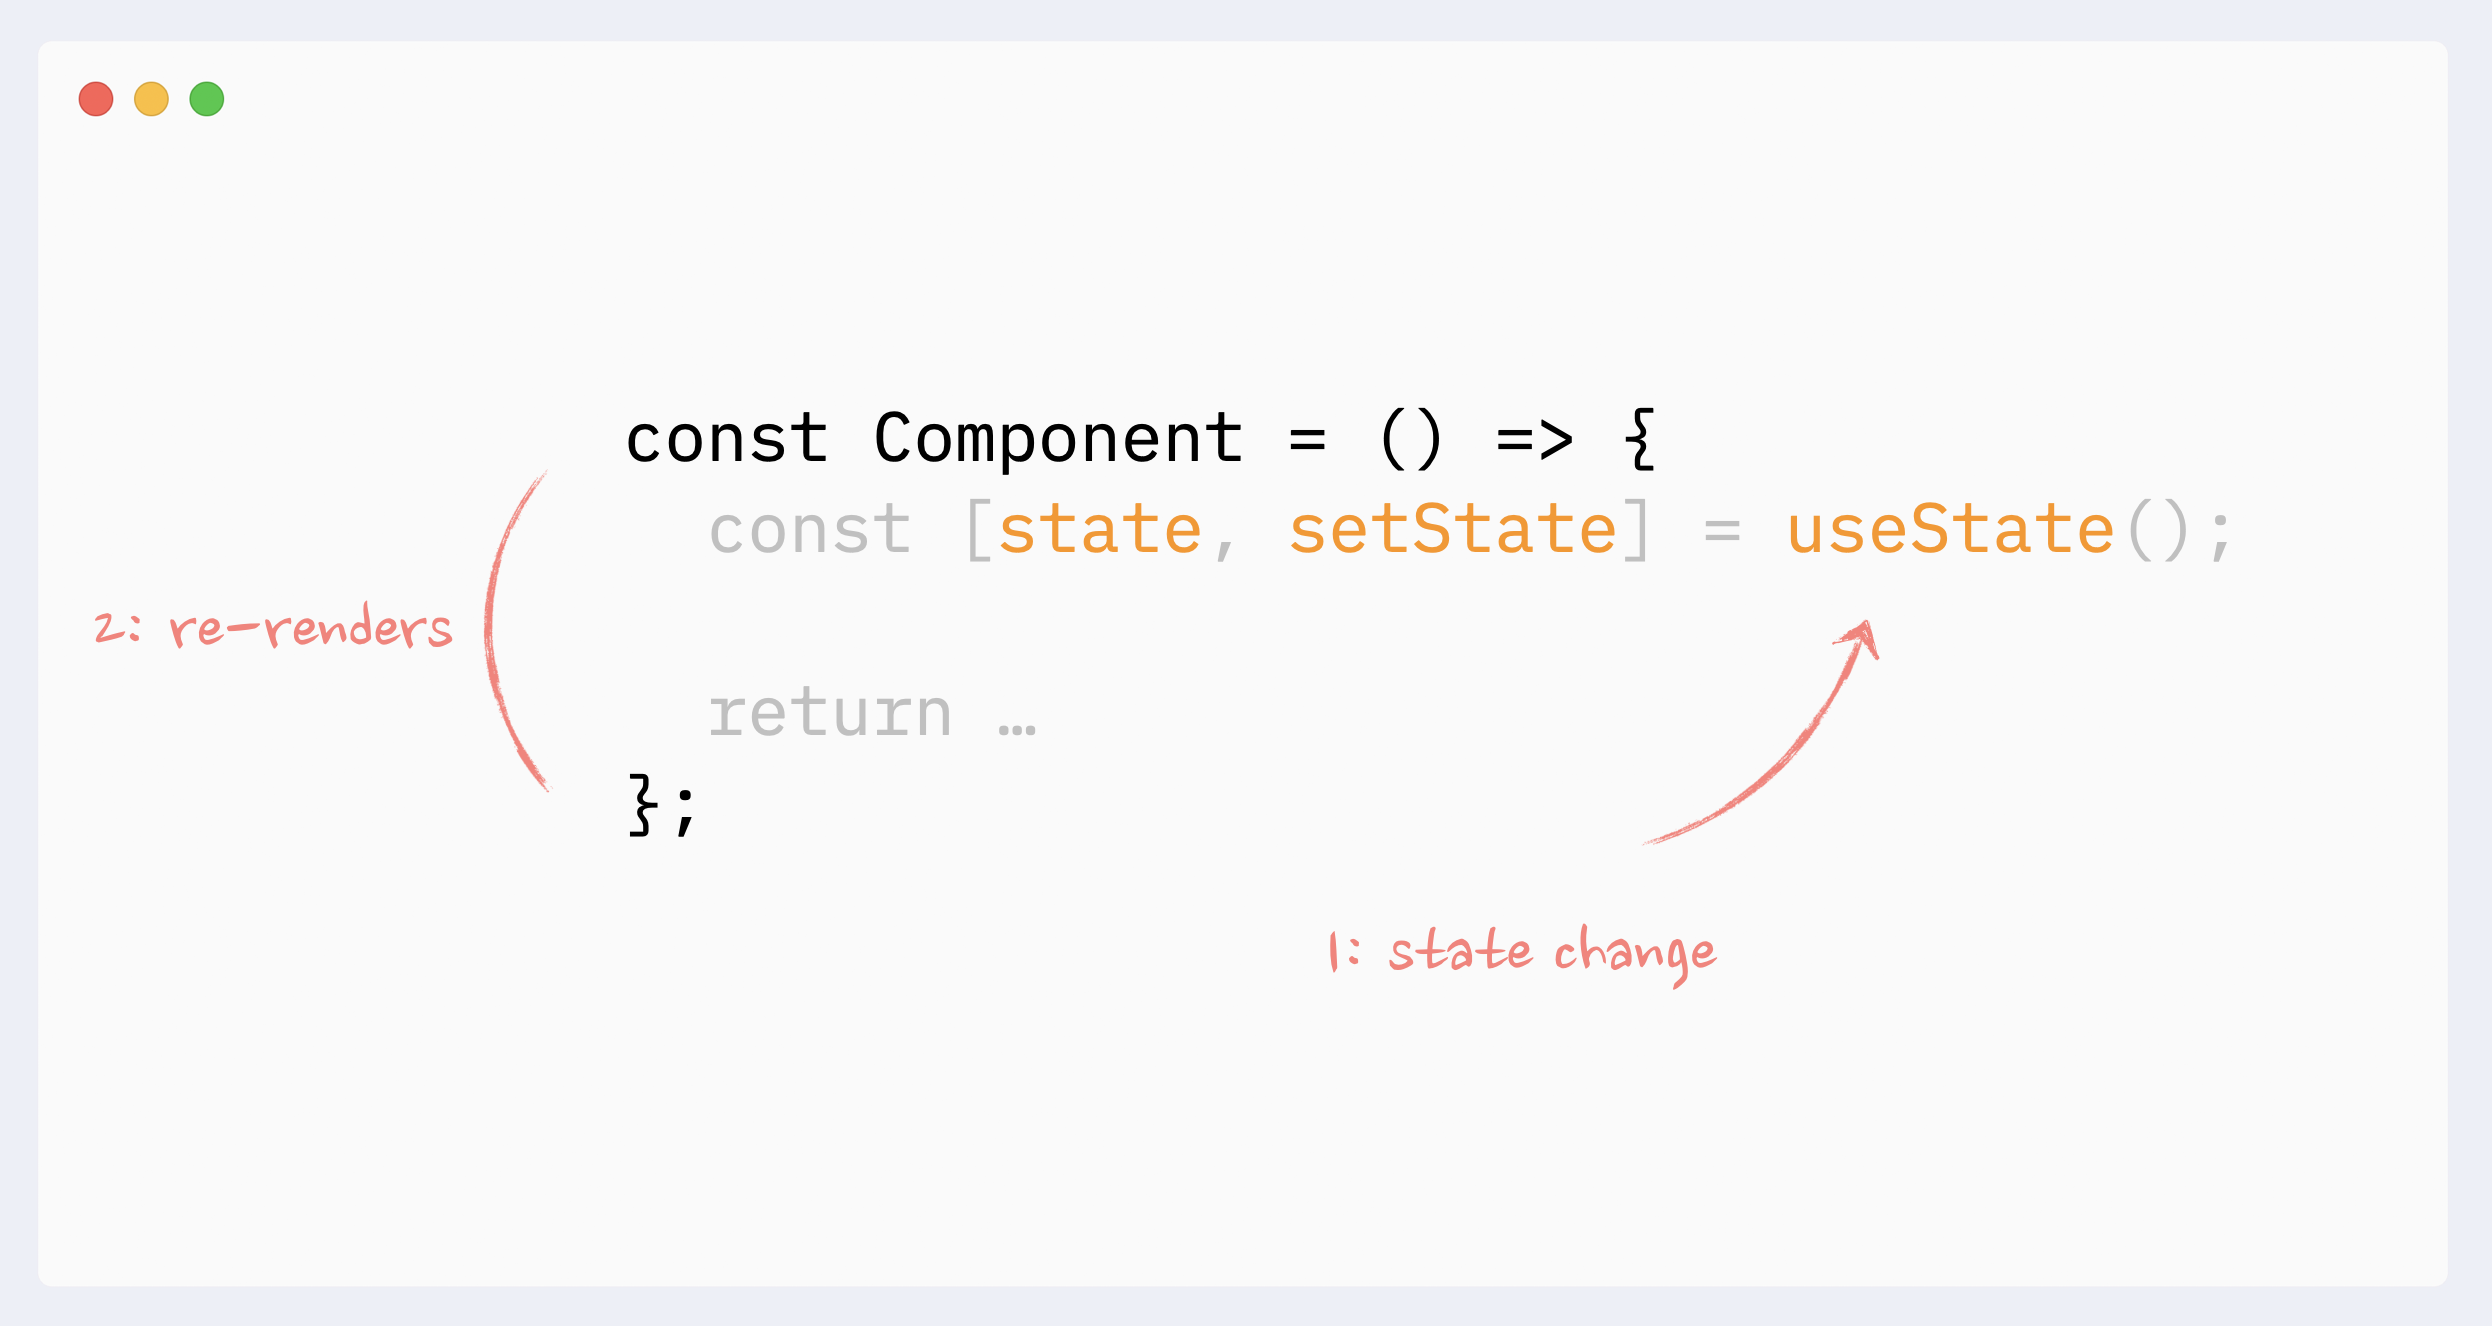
1. Re-renders due to state changes

A component’s state change triggers re-render. Usually, in a React code when a component either uses a callback or in useEffect hook, the state changes which is the source of re-renders in most cases.

Consider the following code:

import { useState } from “react”;

import “./styles.css”;

const App = () => {

  const [state, setState] = useState(1);

  const onClick = () => {

   setState(state + 1);

  };

console.log(“Re-render number: “, state);

  return (

   <>

    <h2>Open console, click a button</h2>

<p>Re-render because of state change should be logged on every click</p>

    <button onClick={onClick}>click here</button>

   </>

  );

};

export default App;

Here re-render happens as highlighted here:

https://www.developerway.com/assets/react-re-renders-guide/part2-state-changes-example.png

2. Re-render due to parent re-renders

A component will re-render itself if its parent re-renders and vice versa. It can also be stated that when a component re-renders, it re-renders all its children. The re-render of the components is always down the tree, i.e., if a child re-renders, it will not re-render the parent. However, there are some caveats here, and you must check out this post on React Element, children, parents, and re-renders.

3. Re-renders due to context changes

When the value of a Context Provider changes, all the components that use that Context Provider will re-render. This will happen even if the components do not use the changed value directly. These kinds of re-renders cannot be prevented with memoization directly, and React developers need to find different approaches depending on their code to stop them.

Here’s an example:

  const value = useMemo(

   () => ({

    value: state

   }),

   [state]

  );

  return (

<Context.Provider value={value}>

    <button onClick={onClick}>click here</button>

    {children}

</Context.Provider>

  );

};

const useValue = () => useContext(Context);

const Child1 = () => {

  const { value } = useValue();

console.log(“Child1 re-renders: “, value);

  return <></>;

};

const Child2 = () => {

  const { value } = useValue();

console.log(“Child2 re-renders”, value);

  return <></>;

};

const App = () => {

  return (

   <Provider>

    <h2>Open console, click a button</h2>

    <p>Both children will re-render because of context</p>

    <Child1 />

    <Child2 />

   </Provider>

  );

};

export default App;

When you run this code in the console and click the button, both children will re-render because of the Context.

4. Re-renders due to hook changes

Whatever happens within a hook is directly associated with its component. As with Context and State changes, any change within a hook triggers component re-render. Whenever the state inside the hook changes, it will trigger an unpreventable re-render of the “host” component. Also, if the hook uses Context and its value changes, the host component will be re-rendered.

Conclusion 

React re-render is an essential concept to understand for React developers. Preventing unnecessary re-renders is necessary for React app performance and efficiently utilizing resources. The listed four scenarios are how React re-renders components.

Talent500 is the global platform companies use to hire talented React developers. Sign up here and join our elite talent pool.


5 common mistakes to avoid when using React in 2022

Since Facebook released React in 2013, it has become one of the most widely used JavaScript frameworks. According to Statista, React is the world’s second most used web development framework. As the popularity of JavaScript remains high, React utilizes its capabilities to provide the most comprehensive tool sets to build web and mobile applications.

As a React developer, you have the opportunity to be part of a technology that has immense growth potential shortly. More and more web developers are adopting this JavaScript framework. Backed by Facebook and a vast developer community, React is a framework to master if you want to become a web developer.

However, there are some common mistakes that you must avoid. Here we take a look at the most common React mistakes developers commit.

1. Not creating enough components

A common mistake any React developer can make is not creating enough components. React is a highly versatile language, and if you are creating a few significant components, you’re missing its reusability. While it is not wrong to produce large components that execute many tasks, it is recommended that you create smaller components, more preferably, one component corresponding to one function. This approach saves time and is a significant benefit when debugging the code. Any errors can be easily spotted as you know which components are associated with which functions.

Here is an example of a TodoList component broken down to single functions:

// ./components/TodoList.js

 import React from ‘react’;

 import { useTodoList } from ‘../hooks/useTodoList’;

import { useQuery } from ‘../hooks/useQuery’;

import TodoItem from ‘./TodoItem’;

import NewTodo from ‘./NewTodo’;

const TodoList = () => {

  const { getQuery, setQuery } = useQuery();

  const todos = useTodoList();

  return (

   <div>

    <ul>

     {todos.map(({ id, title, completed }) => (

      <TodoItem key={id} id={id} title={title} completed={completed} />

     ))}

     <NewTodo />

    </ul>

    <div>

     Highlight Query for incomplete items:

     <input value={getQuery()} onChange={e => setQuery(e.target.value)} />

    </div>

   </div>

  );

};

 export default TodoList;

2. Modifying the state directly

Another common mistake React developers commit is modifying the state directly. As a rule of thumb, in React, the state must always be immutable; otherwise, there will be performance issues that will be difficult to fix.

Here’s a code:

const modifyPetsList = (element, id) => {

  petsList[id].checked = element.target.checked;

setPetsList(petsList);

};

Here we want to update the checked key of an object in the array based on the state of the checkbox, but there is an issue. React cannot observe and trigger the re-rendering of the object because it has been changed with the same reference.

Either you can use the setState() method or the useState() hook to fix the issue. These methods will ensure that React acknowledges the changes made to the object and that your DOM is correctly re-rendered.

3. When rendering the list, do not use the key

If you are a beginner or used our React developer toolkit to learn the language, you must have come across the prompt when you render a list according to the method described in the documentation.

For example, rendering these arrays:

const numbers = [1, 2, 3, 4, 5];

const listItems = numbers.map((number) => <li>{number}</li>);

will display this prompt on the console “a key should be provided for list items.”

The solution is obvious here. We have to follow the prompts and add the key attribute to each item like this:

const numbers = [1, 2, 3, 4, 5];

const listItems = numbers.map((number, index) => <li key={index}>{number}</li>);

The key helps React identify which elements have changed, which is why you need to assign a unique value to the key. In the above example, we have used the index as the key value.

However, we do not recommend you to use the key and ignore the prompt.

This is because the value of the key will change every time an item is added or removed from the array. It will result in performance degradation.

4. Using Redux too much

Redux is becoming very popular among React developers, primarily working on large apps. It is helpful as it helps manage global state, but you don’t have to use it to manage every state in your React apps.

If your applications do not use parallel-level components that need to exchange information, then there is no need to use Redux. Instead, you should use a local state method or useState when you use form components or want to check the state of an element every time it is accessed.

5. Incorrect use of boolean operators

In JSX/TSX syntax, React developers often use boolean values to control rendered elements utilizing the && operator like this:

const count = 0;

const Comp = () => count && <h1>Chris1993</h1>;

While we want that page to display empty content at this time, it will actually display 0 on it.

The error is because the falsy expression causes elements after && to be skipped. However, the value of the falsy expression is returned.

The correct way to write the condition without relying on the JavaScript’s boolean value to compare:

const count = 0;

const Comp = () => count > 0 && <h1>Chris1993</h1>;

Now the page will display empty content.

Conclusion 

Now that you have learned some common React mistakes, keep them into account when creating your next React app. Gradually you can inculcate these best practices and soon they will become a learned behavior and improve your code quality.

And if you are an experienced React developer, join Talent500. We are a global remote team-building platform that Fortune500 companies and fast-growing startups use to hire talent.


6 VS Code extensions to boost productivity as a React developer

Every developer wants to write better code quicker. Unfortunately, keeping the code clean and clear is difficult, especially when working with a JavaScript framework like React. Importing, concatenating, and refactoring code requires formatting and reorganizing. It slows down the React developers and affects their productivity. Fortunately, there are ways to work more efficiently by following predefined rules for structuring the project, components, write styles, and test functions.

The VS Code is one of the most widely used IDE or code editors from which React developers can benefit. As some tremendous VS Code extensions are available, it is easier for developers to automate several parts of the coding process that boost their productivity.

We share some of the best VS Code extensions you can use to write cleaner code much quicker.

1. Settings Sync

Before you start creating a more productive environment by installing extensions left and right, you must ensure you can take the VS Code settings to the device you use.

Settings Sync is the VS Code extension you must install to ensure that every customization you make to the VS Code can be synced to GitHub. It can sync everything from settings, and keyboard shortcuts, to VS Code extensions.

With this extension installed, you can access your preferred IDE from any device you want without losing the settings or extensions. It saves much time as you don’t have to manually set up the development environment from scratch on a new device.

2. Prettier and Eslint

The two VS Code extensions that every React developer must use are the Prettier and Eslint. These tools help you write a cleaner and well-formatted code and check it for common mistakes.

Prettier is a formatter that organizes your JavaScript code in an easy-to-read and maintained format. You can download it directly from the VSCode marketplace library here. Eslint is a linter that automatically catches and fixes coding errors like missing ; or }. This linter is available here.

After download and installation, you can create two config files (.prettierrc and .eslintrc.JSON) to define the rules of how your code should look or how to check it for errors. If you are using other plugins for code formatting or linting, you have to define them in the eslint config file to ensure that there are no conflicts. These extensions highlight the errors within the code so that you can easily format or correct the errors they can’t.

3. VS Code React Refactor

Code refactoring is a common task when you are working on a project and want to change an existing function. With VS Code React Refractor, you can easily select the code lines you want to refactor, and this VS Code extension will extract those lines into a new component.

It is one of the best extensions to refactor your React code or create new components based on predefined templates. You can install this extension directly from the VS Code marketplace. Another reason to use this refactor plugin is to accelerate the coding process without spending too much time trying to format or create new components.

4. Bracket Pair Colorizer

It’s pretty evident why this VS Code extension is a popular choice of coders. This VS Code extension gives the opening and closing brackets matching colors, making it much easier to debug the code. You can install the extension from here.

It also makes the code much more readable as it is easier to understand which brackets belong together. You can further extend the functionality of the Bracket Pair Colorizer by configuring custom bracket characters to add a background color to highlight the active scope enclosed within brackets.

5. GitLens

While using Git as a standalone tool in combination with VS Code is an obvious move, with GitLens, you can supercharge the functionality of Git for VS Code and access a lot of untapped information regarding repositories directly from the IDE.

You can easily view who, how, and why lines of code have changed over time. Furthermore, it also allows you to view code authorship using Git blame annotations and CodeLens. This VSCode extension is a must if you work on collaborative code. It offers rich visualizations, powerful comparison commands, and the ability to customize any setting as per your project requirement. Install GitLens from here.

6. ES7+ React/Redux/React-Native snippets

You can install this VSCode extension here. It is a great plugin with React, React Native, and Redux that use ES7+ syntax. This extension can create any element – new components, functions, classes, methods, and more. Furthermore, it makes it easier and faster to write hooks like useEffect and useCallback. ES7+ React/Redux/React-Native snippets are highly customizable and inherently support Prettier.

Conclusion 

We hope these VS Code extensions will help you significantly boost your productivity without impinging your code quality. Not just React developers, but JavaScript developers working with other frameworks can also use these extensions.

For more resources, you can refer to our React developer toolkit, which lists several learning and upskilling resources for React developers. You can also join our elite pool of talent here to find the best job opportunities.


3 useful tips to clean up your React component types

React is created by Facebook to allow developers to have control over all the functions of JavaScript and have the freedom to code in any style. However, developers must follow some common patterns and conventions for reusability and maintainability. Writing clean React component code is a standardizing technique for a unified project structure.

React Components are independent and reusable bits of code that help make the code much more concise. They are similar to JavaScript functions, the only difference being that they work in isolation and return HTML. As a React developer, you will use the React component library often to write code faster and more efficiently.

This post looks at some of the best practices for writing clean React component types.

1. Write React components in TypeScript

TypeScript offers a type interface allowing developers to write better code without worrying about explicitly defining each variable type. It is the property of TypeScript to infer the style of the variable from its value. In the context of a React component, it can be used to write code without explicitly defining the variable type in the codebase. It helps clean up the component codebase.

Here is an example of how TypeScript can infer the return type of the React components without explicitly defining it; the resulting code is cleaner.

// Letting TypeScript inferring the type: (props: MyProps) => JSX.Element

const MyComponent = (props: MyProps) => <div>beep</div>;

// Explicitly defining a return type (3 similar options of writing the same as above)

const MyComponent = (props: MyProps): ReactElement => <div>boop</div>;

const MyComponent = (props: MyProps): JSX.Element => <div>boop</div>;

const MyComponent: FC<MyProps> = (props) => <div>boop</div>;

Some developers argue that using TypeScript to allow React component code to infer the return type can be risky. It is possible in more dynamic systems, so it is advised to check the inferred type to avoid making mistakes.

Since the release of React hooks in version 16.8, components can be written as functions because you can get the same functionality with much less code. The React.FC type from the @types/react package is used to mark a function as a component.

2. Use maps over if/else

When creating React components try to use maps over if/else statements wherever possible. The if/else statements create nesting within the code that makes the codebase challenging to read or maintain.

React component code can be greatly simplified with maps, and nesting can be avoided. Here is an example of a component using if/else:

const Student = ({ name }) => <p>Student name: {name}</p>

const Teacher = ({ name }) => <p>Teacher name: {name}</p>

const Guardian = ({ name }) => <p>Guardian name: {name}</p>

export default function SampleComponent({ user }) {

   let Component = Student;

   if (user.type === ‘teacher’) {

     Component = Teacher

   } else if (user.type === ‘guardian’) {

     Component = Guardian

   }

 return (

     <div>

      <Component name={user.name} />

     </div>

   )

}

The same React component when written using maps, the complexity of the code eases. Here’s how:

import React from ‘react’

const Student = ({ name }) => <p>Student name: {name}</p>

const Teacher = ({ name }) => <p>Teacher name: {name}</p>

const Guardian = ({ name }) => <p>Guardian name: {name}</p>

const COMPONENT_MAP = {

   student: Student,

   teacher: Teacher,

   Guardian: Guardian

}

export default function SampleComponent({ user }) {

   const Component = COMPONENT_MAP[user.type]

return (

     <div>

      <Component name={user.name} />

     </div>

   )

}

When you use maps, the components become more declarative and much easier for any developer to comprehend. Furthermore, it makes it easy to extend the logic or add more items to it.

3. Split larger components 

One of the best ways to write cleaner React components is to use the ‘separation of concern‘ method to split more significant components. In the context of React components, the separation of concern implies separating the parts of the components responsible for displaying the element tree from the ones responsible for fetching and mutating the data.

The hooks were introduced in React to facilitate separation of concern and allow developers to write cleaner code. In practical applications, it is used for wrapping the logic that manages API calls or global state connections with a custom hook.

Here’s an example of React component:

import React from ‘react’

import { someAPICall } from ‘./API’

import ItemDisplay from ‘./ItemDisplay’

export default function SampleComponent() {

   const [data, setData] = useState([])

useEffect(() => {

    someAPICall().then((result) => {

      setData(result)

     })

   }, [])

function handleDelete() {

    console.log(‘Delete!’);

   }

function handleAdd() {

    console.log(‘Add!’);

   }

const handleEdit = () => {

    console.log(‘Edit!’);

   };

return (

     <div>

      <div>

        {data.map(item => <ItemDisplay item={item} />)}

      </div>

<div>

        <button onClick={handleDelete} />

        <button onClick={handleAdd} />

        <button onClick={handleEdit} />

      </div>

     </div>

   )

}

Now, the same component is refactored with the code split using custom hooks:

import React from ‘react’

import ItemDisplay from ‘./ItemDisplay’

export default function SampleComponent() {

   const { data, handleDelete, handleEdit, handleAdd } = useCustomHook()

return (

     <div>

      <div>

        {data.map(item => <ItemDisplay item={item} />)}

      </div>

      <div>

        <button onClick={handleDelete} />

        <button onClick={handleAdd} />

        <button onClick={handleEdit} />

      </div>

     </div>

   )

}

Conclusion

As a React developer, understanding the ways of creating clean components enable you to write cleaner, readable, and maintainable code. It is one of the qualities we use to vet React developers when they join Talent500. For more React developer resources, check out this React developer toolkit.

We are a global remote team building platform startups, and Fortune 500 companies use. If you want to explore opportunities, join us here.


Essential React design patterns for developers

React has kept its spot of being the most widely used JavaScript framework since its inception. It is used on 24% of the entire internet, making it a great JavaScript library to master. As a front-end developer, you must keep up with the evolution of technologies, but React is a framework that keeps steady with its reusable components. Learning React.js will benefit your career as it is there to stay.

Facebook, the creator of React, actively develops and maintains the library giving it the much-needed edge over other frameworks and libraries. React can use the design patterns to offer a robust development environment compared to other JavaScript libraries.

The importance of React design patterns 

Design patterns are essential concepts of project development. React and every other programming language has some design patterns that help prevent the commonly occurring problems in software development.

In simpler terms, React design patterns are the basic templates upon which you can build a program’s functionality according to the given requirements. Developers who understand design patterns can speed up the development process. Also, such software engineers will be able to write easier-to-read and maintain code.

This article will cover some basic React design patterns that developers must know.

The HOC (Higher Order Component) Pattern

When creating Reactive applications, you often have to use the same logic in various modules—for instance, using the same design elements for different Card Views or third-party subscription data components in the interface design.

Higher-order components are a popular React design pattern for creating logic shared between various components. With the HOC pattern, you don’t have to rewrite the code; you can extend the existing code’s functionality. HOC functions are considered pure functions as they do not have any side effects on the quality of the code.

A HOC function is a JavaScript function that takes a component as an argument and returns another component by adding additional data to the Component. This functionality is inherent to React as the programming language prefers composition over inheritance. Here’s an example of a HOC React design pattern:

import React, { Component } from “react”;

const higherOrderComponent = (DecoratedComponent) => {

  class HOC extends Component {

   render() {

    return <DecoratedComponent />;

   }

  }

  return HOC;

};

Many popular React frameworks use this design pattern, most notably Redux’s connection function. If your project is based on React or Redux, you can use a higher-order component design pattern to simplify your code and make it more maintainable.

React Hooks design patterns

Hooks were introduced in React version 16.8, and they revolutionized how developers build React components. The React Hook API lets components access the most commonly used React features like state, props, context, refs, and lifecycle. When you use the React Hook design pattern, you increase the potential of functional components as they are now as powerful as the class components.

A React Hook design pattern might seem similar to a Presentational and Container Components design pattern, but there’s a difference. 

Presentational and Container Component design patterns usually create massive logic split across different lifecycle methods. Such components are hard to read and maintain. React Hooks make functional components highly robust, and they can perform all the functions of containers but without their limitations.

Here’s an example of a container method:

import React, { Component } from “react”;

class Profile extends Component {

constructor(props) {

   super(props);

   this.state = {

    loading: false,

    user: {},

   };

  }

componentDidMount() {

  this.subscribeToOnlineStatus(this.props.id);

  this.updateProfile(this.props.id);

  }

componentDidUpdate(prevProps) {

   // compariation hell.

   if (prevProps.id !== this.props.id) {

   this.updateProfile(this.props.id);

   }

  }

componentWillUnmount() {

this.unSubscribeToOnlineStatus(this.props.id);

  }

subscribeToOnlineStatus() {

   // subscribe logic

  }

unSubscribeToOnlineStatus() {

   // unscubscribe logic

  }

  fetchUser(id) {

   // fetch users logic here

  }

  async updateProfile(id) {

   this.setState({ loading: true });

   // fetch users data

   await this.fetchUser(id);

   this.setState({ loading: false });

  }

  render() {

   // … some jsx

  }

}

export default Profile;

The code is not optimal. The setState() can only change the first level of any state object. Also, the inline action methods like the onHandleChange() increase the line of code. Related logic is repeated multiple times.

The same code using React hooks design pattern:

import React, { useState, useEffect } from “react”;

function Profile({ id }) {

  const [loading, setLoading] = useState(false);

  const [user, setUser] = useState({});

// Similar to componentDidMount and componentDidUpdate:

  useEffect(() => {

  updateProfile(id);

  subscribeToOnlineStatus(id);

   return () => {

   unSubscribeToOnlineStatus(id);

   };

  }, [id]);

 const subscribeToOnlineStatus = () => {

   // subscribe logic

  };

const unSubscribeToOnlineStatus = () => {

   // unsubscribe logic

  };

const fetchUser = (id) => {

   // fetch user logic here

  };

const updateProfile = async (id) => {

  setLoading(true);

   // fetch user data

   await fetchUser(id);

  setLoading(false);

  };

return; // … jsx logic

}

export default Profile;

Now you have direct access to the state of objects, and functional components can also use state. The useEffect method replaces lifecycle methods like componentDidMount and componentWillInmount, making code cleaner and concise.

Conclusion 

React design patterns can give you access to fantastic programming language features to create scalable, secure, and robust React apps. The above two React design patterns are generally used to write clean and maintainable React code. Also, don’t miss our React developer toolkit that lists additional resources React developers can use to upskill.

Talent500 is a platform for React developers to find opportunities at global companies. Join our elite pool of talent to get discovered by international companies. Sign up here.


5 useful cheat codes for React

Facebook created React in 2013 as an alternative to AngularJS, the prominent JavaScript framework at the time. To better suit the requirements of Facebook’s server-side rendering, React was made very different from Angular. For instance, React is a dynamic library while Angular is a restrictive framework. React supports flexible TypeScript, but Angular supports only static TypeScript. Such differentiations led to the development of web frameworks by leaps and bounds.

Today, React is the second most popular JavaScript framework in the world. If you are getting started with this JS framework, it might seem overwhelming. However, our engineers created this React cheat sheet to give you an overview of some important React features in simple-to-understand snippets.

1. JSX

JSX is short or JavaScript XML which is a syntax extension of JavaScript to write HTML code. 

It will be a bit complicated if you have to write HTML in React without JSX. Here’s an example: 

const myelement = React.createElement(‘h1’, {}, ‘Hello World!’);

ReactDOM.render(myelement, document.getElementById(‘root’));

The same code can be restructured like this using JSX: 

const myelement = <h1>Hello World!</h1>;

ReactDOM.render(myelement, document.getElementById(‘root’));

Evidently, JSX makes it a lot easier and faster to write HTML elements in React code. In its absence, you will be forced to use the ReactDOM.render() function, which takes two arguments – the HTML code and the HTML element to render the code. 

Here’s an extensive JSX cheat sheet that React developers must check out.

2. React fragments

In React, it is required that all returned elements must be returned within a “parent” component. For example, consider the following code:

function MyComponent() {

  return (

    <h1>My header</h1>

    </p>My paragraph</p>

  );

It is an invalid React code because here, two sibling elements, H1, and a paragraph, are returned from the same component. 

React has an element called a fragment. They are the components that allow wrapping or grouping multiple elements without adding an extra node to the DOM.

If you want to overcome this limitation, you can use a fragment.

// valid syntax

function MyComponent() {

  return (

    <>

      <h1>My header</h1>

      </p>My paragraph</p>

    </>

  );

Here we did not wrap our elements in any container element like a DIV, instead used a fragment. The syntax for using React fragments is: 

<React.Fragment>

.

.

.

</React.Fragment> 

or 

<>

.

.

.

</>.

3. React conditionals

All React components and elements are displayed conditionally. A basic approach to creating a separate return is using an if-statement like this: 

function App() {

const isAuthUser = useAuth();

  if (isAuthUser) {

    // if our user is authenticated, let them use the app

    return <AuthApp />;

}

  // if user is not authenticated, show a different screen

  return <UnAuthApp />;

}

React codes using if-statement can be highly nested. It is possible to write a conditional within a return statement. It simplified the React code like this: 

function App() {

const isAuthUser = useAuth();

  return (

    <>

      <h1>My App</h1>

      {isAuthUser ? <AuthApp /> : <UnAuthApp />}

    </>

  ) 

}

You must wrap the entire conditional in curly braces. Also, a conditional must resolve to a value.

4. React context

You can use context to pass data to the React components tree without using props. The problem with props is that we are sometimes forced to pass them through components that don’t need them in React codes. This is known as props drilling

In the snippet below, the props are passed through a Body component that doesn’t need it:

function App() {

  return (

    <Body name=”John Doe” />

  );

function Body({ name }) {

  return (

    <Greeting name={name} />

  );

function Greeting({ name }) {

  return <h1>Welcome, {name}</h1>;

}

To overcome this issue, we use the createContext function from React. 

You can call context with an initial value. A createContext function has two components – a Provider and a Consumer property. The Provider is wrapped around the component tree through which the given value is to be passed. Next, you place the Consumer in the component from which you want to consume the value. 

Example code:

import { createContext } from ‘react’;

const NameContext = createContext(”);

function App() {

  return (

    <NameContext.Provider value=”John Doe”>

      <Body />

    <NameContext.Provider>

  );

function Body() {

  return <Greeting />;

function Greeting() {

  return (

    <NameContext.Consumer>

      {name => <h1>Welcome, {name}</h1>}

    </NameContext.Consumer>

  );

}

However, before you use the context to optimize the React code, see if you can better organize the components to avoid passing props through components that don’t require it.

5. React useState hook

Hooks were introduced in React version 16.8 and completely overhauled React’s use. They allow adding reusable, stateful logic to React function components.

One important React hook is useState. It does what it says; it allows React developers to use stateful values in function components.

The useState hook is preferable over a simple variable because when the component’s state is updated, it can display the updated value.

Here’s an example of using useState to increment a counter: 

import { useState } from ‘react’;

function MyComponent() {

  const [stateValue, setStateValue] = useState(initialValue);

}

We can identify the current count from the count variable and can increment the state by passing count + 1 to the setCount function like this:

import { useState } from ‘react’;

function Counter() {

  const [count, setCount] = useState(0);

function updateCount() {

    setCount(count + 1);

  }

return <button onClick={updateCount}>Count is: {count}</button>;

}

Conclusion

Even though it is fairly concise, this React cheat sheet covers the five most important features of the JavaScript framework that beginners should learn. As you practice and grow, you will discover many more features. Don’t be intimidated or overwhelmed; just start writing code. 

React developers can explore job opportunities with Talent500. We are a trusted partner of some of the largest tech companies to build their engineering teams. Join our elite pool of talent.


React useEffect v/s useLayoutEffect Hook: Key differences

React is a popular frontend UI library that is used in almost 50 million projects each month. React, which is supported by Facebook, has a long history of dominance in the web development industry and a long list of notable clients, including Fortune 500 firms and both startups and established businesses.

React utterly depends on components, which are the basic building blocks of React applications. There are two approaches to writing a React component in the world of React. The first employs a functional approach, whereas the second employs a class-based approach. These days, functional components are quite popular, and the introduction of hooks has encouraged more people to adopt creating function-based components.

Some of the most useful hooks available are useState, useEffect, useRef, useLayoutEffect, useMemo, etc. In this in-depth article, we will cover the difference between the useEffect and useLayoutEffect hooks. 

What is the useEffect hook in React?

Eliminating the side effects of using class-based components is the driving force behind the development of useEffect Hook. One thing to keep in mind is that useEffect only runs after React renders your component, so your effect callback will not prevent browser painting. This is different from how class components behave, where componentDidUpdate and componentDidMount run synchronously following the rendering. This approach is more efficient, which is generally what you want most of the time.

For instance, actions like updating the DOM, obtaining data from API endpoints, configuring timers or subscriptions, etc., may have unintended side effects.

The following situations in functional components allow for the use of the useEffect hook to carry out operations (or side effects):

  • when a component is rendered (componentDidMount function in class-based components).
  • when a component undergoes an update (componentDidUpdate function in class-based components).
  • before a component is unmounted or removed (componentWillUnmount function in class-based components).

Most frequently, we use useEffect hooks to carry out actions such as obtaining data from an API, altering the DOM, or performing a specific method when the useEffect’s dependency changes.

How to write useEffect hooks in React

Every time the useEffect hook is activated, it returns a callback function that will execute the declared function. The dependency array decides when the useEffect should be triggered. If we have an empty dependency array, the useEffect will only work once when the component renders. If we have single or multiple dependencies, useEffect will be triggered whenever the dependencies undergo a change.

Let’s examine a straightforward example of useEffect in action.

 The output will be the following:

You can see that when the component renders, the useEffect hooks are only executed once. However, if there is another change in the DOM, it will cause the useEffect to be triggered for the second time. To avoid this, pass an empty dependency array. 

Now that we have a good idea about how the effect works, let’s discuss the useLayoutEffect hook in React.

What is useLayoutEffect hook in React?

React’s useLayoutEffect hook is almost identical to the useEffect hook. A function called effect and an array of dependencies are the first and second arguments, respectively, for the useLayoutEffect hook. 

After all DOM mutations have been completed by React, useLayoutEffect executes synchronously. If you need to measure the DOM (for example, to determine the scroll position or other styles for an element) and then modify the DOM or cause a synchronous re-render by changing the state, this can be helpful.

The useLayoutEffect hook’s syntax is almost identical to that of the useEffect hook. The effect, the first argument, has two possible outcomes: cleanup function or undefined. The code below demonstrates the useLayoutEffect function.

As you can see from the function above, useEffect and useLayoutEffect both accept an array of dependencies and an effect function as arguments, and they return either undefined or a cleanup function.

Let’s examine a sample of how to use the useLayoutEffect hook. 

The output of the following will be:

It is noticeable that useLayoutEffect functions in a manner identical to that of the useEffect hook. So what is the actual difference between these two hooks?

What is the difference between useLayoutEffect and useEffect hook?

The main difference between the useEffect hook and the useLayoutEffect hook is that the useEffect hook serves asynchronously, whereas the useLayoutEffect hook works synchronously. In simple words, we can say that the difference between useEffect and useLayoutEffect is in the time at which these functions are invoked.

It is useful to be aware of the steps that component re-render takes in order to comprehend when the hooks are called. Assuming that the useEffect hook is active in our app, we can get this series of events to happen.

  1. The user engages with the React app. Let’s just say the user clicks a button on the UI.
  2. The state of the components changes.
  3. The DOM is then mutated.
  4. Changes are then reflected on the browser screen.
  5. The function is invoked to clean up effects from the previous render if useEffect dependencies have changed.
  6. Following cleanup, the useEffect hook is invoked.

For the useLayoutEffect hook, the series of events will be

  1. The user interacts with the app. Let’s just say the user clicks a button on the UI.
  2. The state of the components changes.
  3. The DOM is then mutated.
  4. The function is invoked to clean up effects from the previous render if useLayoutEffect dependencies have changed.
  5. Following cleanup, the useLayoutEffect hook is invoked.
  6. The browser screen updates to reflect changes.

Your effect will typically involve synchronizing some state or props with something that doesn’t need to happen instantly or that doesn’t visually change the page. We might only need to retrieve data from an API, set an event handler, or take action when the state changes. The useEffect hook is employed to accomplish these kinds of tasks.

When to use useLayoutEffect hook in React

The useLayoutEffect hook should be used when your component flickers when the state is updated, which means that it first renders in a partially-ready state before re-rendering in its final state right away.

Now let’s compare useLayoutEffect and useEffect using an example:


We developed a simple app with a button element. When the user clicks the button, the value is updated to 0 and the dependency array of the useLayoutEffect array is value. Within the useLayoutEffect, we check the value and if it is 0, it changes the value from 0 to a random number.

In this example, the component is rendered twice, but the value is only updated once in the browser. Let’s look at the same example with useLayoutEffect.


You can see there is flickering when using useEffect since the component is rendered twice and the value is also updated twice.

Even though the component renders twice, the version with useLayoutEffect only updates visually once. On the other hand, the useEffect version renders twice, resulting in a blip where the value is briefly 0.

The main difference between the useEffect and useLayoutEffect hooks, as shown in the example, is the time at which they are fired. We will look into some real-world applications of these two hooks with some examples.

Let’s create an app that fetches data from a dummy backend API.


The output of the following code will be:

If you run this example on your machine, you will see that data is populated first in useLayoutEffect and then in useEffect. This is just because of the synchronous nature of the useLayoutEffect hook and the asynchronous nature of the useEffect hook.

UseLayoutEffect is preferred over useEffect hooks in the following situations:

Unforeseen visual or state changes

When dealing with inconsistent visual changes, the useLayoutEffect truly shines. When you use useEffect, you’ll notice a flicker before the DOM changes are painted, which is caused by how refs are passed on to custom hooks. These refs are initially null before being set when the attached DOM node is rendered.

When the effect does not require heavy computations 

Both useEffect and useLayoutEffect behave differently in terms of how heavy computations are handled. As previously stated, useEffect will postpone the execution of the effect function until after the DOM mutations have been painted, making it the obvious choice of the two. 

When we do heavy computation inside useLayoutEffect, we will block the DOM to re-render for some time. 99% of the time, we don’t need to block DOM updates. At this point in time, we only need to use useEffect and not useLayoutEffect.

Which is preferred, useEffect or useLayoutEffect?

The majority of the time, useEffect is the best option. If your code is causing flickering, try using useLayoutEffect instead and see if that tends to help.

Because useLayoutEffect is synchronous, the application will not update visually until your effect has finished running. If you have slow code in your effect, it may cause performance issues such as stuttering. Because most effects do not require breaking the default flow while they run, regular useEffect is always the best option in almost all cases, except a few.

Conclusion 

Congratulations on reaching this far! You’re a fantastic reader!!

In this detailed blog on useEffect v/s useLayoutEffect, we have seen various similarities as well as the uniqueness of useEffect and useLayoutEffect hooks. Not only did we understand the theory, but we also got our hands dirty by going through several real-world examples.

Now you know when to use useEffect and useLayoutEffect efficiently.

Happy Reacting!